1. Beat egg and sugar (first 2 ingredients) with an electric mixer for 5 minutes. Pour the mixture in a medium saucepan.

2. Mix in milk, baking soda and softened butter.
3. Bring a large pot of water to a boil. Place the saucepan over boiling water (NOT in the water) and let it be there for about 10 minutes. Stir constantly with a wooden spoon or a silicone spatula.

4. Remove from heat and immediately mix in the flour until the dough is smooth. Let the dough cool at room temperature (it will thicken up).

5. Preheat the oven to 350 degrees F (180 degrees C).
6. Divide the dough into about 9 equal pieces.

7. Place a sheet of parchment paper on your countertop and sprinkle it with flour. Sprinkle some flour over the dough and your rolling pin. Roll out one piece of dough into about 9-inch round (to make an even circle, place the bottom part of a springform or a plate over the dough and cut off the edges; reserve the scraps for later use). To make it easier, you can also roll the dough between two sheets of parchment paper.


8. Bake until golden for about 4 minutes. To save my time, I used a separate sheet of parchment paper for each piece and I baked 2 rounds at a time.

9. When you finish the last piece, form a ball from the rest of the dough and roll it out, then bake. We will need it for the top of the cake.

10. Put heavy cream into a bowl and beat with an electric mixer for 5-6 minutes or until stiff peaks form.

11. With an electric mixer, beat together butter, cream cheese and sweetened condensed milk.

12. Stir in heavy cream.


13. Crush the layer that you don't like most into fine crumbs. Use a food processor or a plastic bag with a rolling pin to do that.

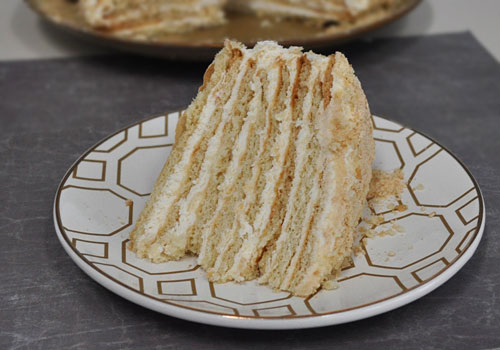
14. Place your first layer on a large plate and spread some frosting over it.

15. Place the next layer on top, spread some frosting over it. Lightly push it down. Repeat with the rest of the layers. Frost the top and sides with the remaining frosting.

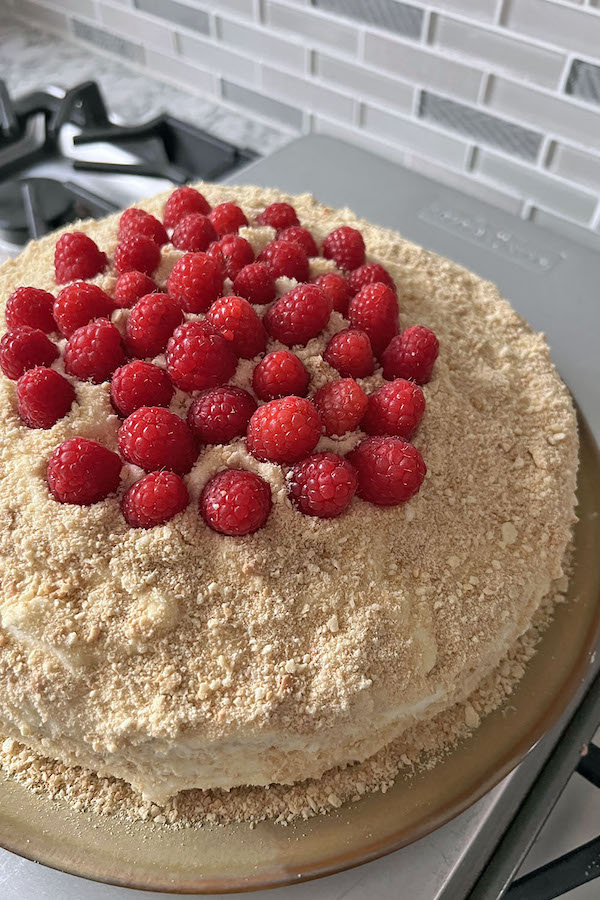
16. Sprinkle the crumbs over the top and sides of the cake.
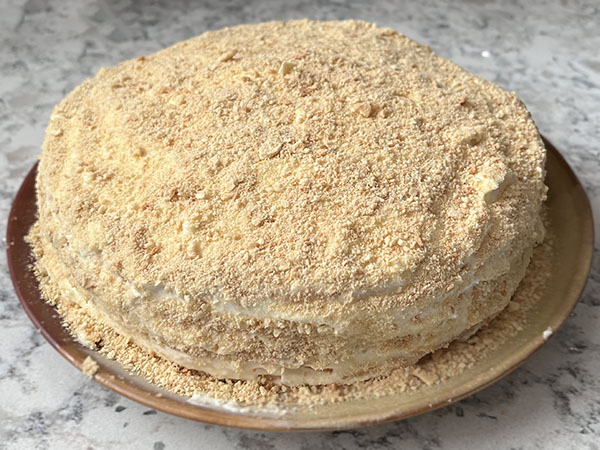
17. Top with raspberries (optional). Refrigerate for 8 hours (for the absolute best result, wait until the next day to enjoy the cake).


.jpg "Beef Chebureki (Deep Fried Beef Dumplings)")


Comments
Butter
GuestAmazing
GuestLeana
GuestRussian Layered Cske
GuestpattieB
Guest